The History of Photography
Camera ObscuraNoun
Its latin name means "dark chamber" and is the photographic camera's ancestor. Essentially, it's a darkened box for projecting the external image on to a screen inside upside down by use of a small hole to let light in. For centuries the technique was used for viewing eclipses of the Sun without endangering the eyes and, by the 16th century, as an aid to drawing; the subject was posed outside and the image reflected on a piece of drawing paper for the artist to trace. |

|
My Camera Obscura

|

|

|
In design, the Camera Obscura is a darkened box. To copy this, a box was created out of black paper, folded at each corner to then tape together. Tracing paper was at one end to mimic the opposite wall where the image would be reflected on, translucent to be able to view the image.A hole was cut on the side across to let light in. To create a lens around the hole, another piece of paper was rolled up, taped together, and taped around the hole. To get the clearest image possible, the length of the lens was played around with by changing the focal length. The focal length is the distance between the centre of a lens (or curved mirror) and its focus (the back of the camera- in this case, the tracing paper). This was achieved by cutting the bottom -- the part glued onto the paper -- into strips and taping those to the right length. Doing this was difficult because it shouldn't be cut too much but also not too little, it was hard to check if it was good enough or if it could be better. A magnifying glass was also added to the top of the lens. Then, to check it worked, the lens turned to the light and the image appeared upside, clear enough to see large details. The construction was not difficult, per say, but the box was fragile so it had to be handled with care.
DSLR Introduction
|
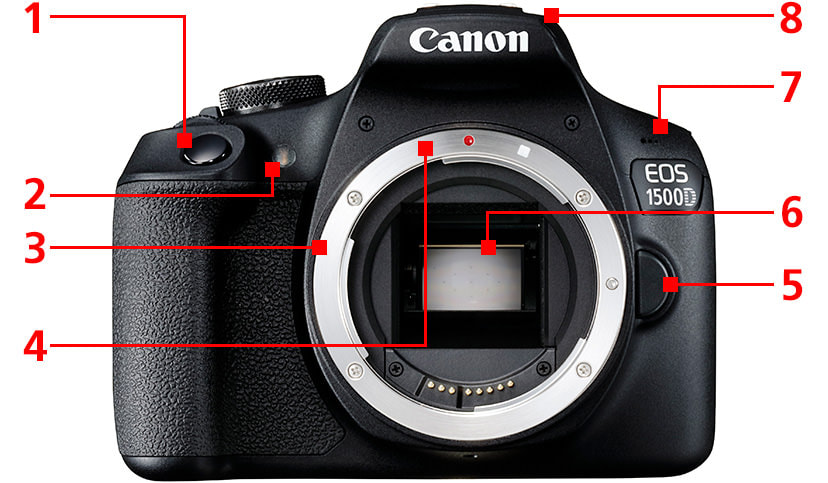
1- Shutter Button
2- Red-eye reduction/Self-timer lamp 3-Lens Mount 4-Lens Moun Index 5-Lens Release`Button 6-Mirror 7-Microphone 8-Built-in-Flash |
|
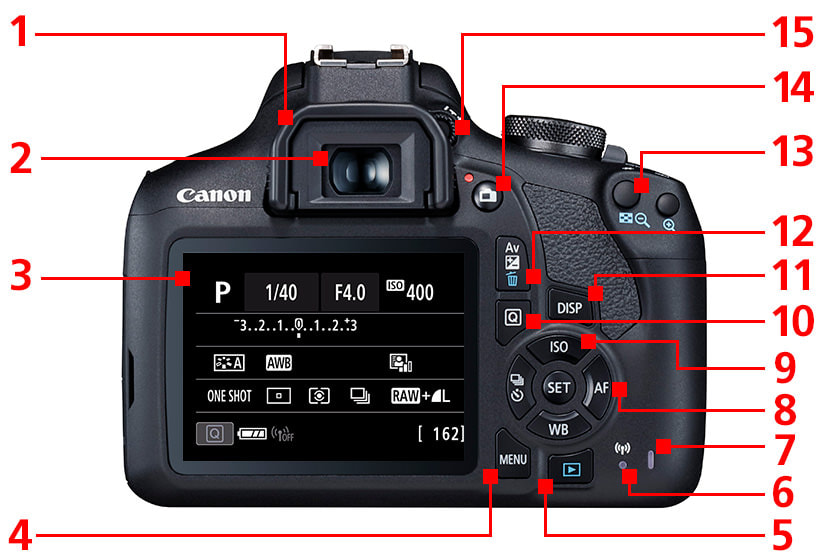
1- Eyecup
2-Viewfinder Eyepiece 3-LCD Monitor 4-MENU Button 5-Playback Button 6-Wi-fi Lamp 7-Access Lamp 8-SET Button/Multi-controller 9-ISO Speed Setting Button 10-Quick Control Button 11-Display Button 12-Erase Button 13-Focus Point Selection Button 14-Live View Shooting/ Movie Shooting Switch 15-Dioptric Adjustment Knob |
|
|
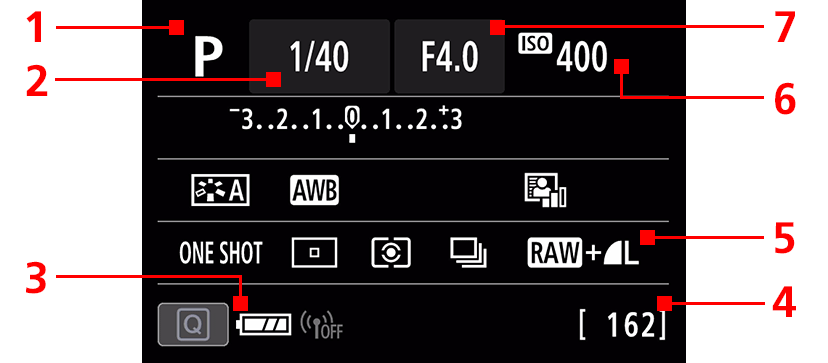
1-Shooting Mode
2-Shutter Speed 3-Battery Level 4-Shots Remain 5-Image-recording Format/Quality 6-ISO Speed 7-Aperture Value |
|
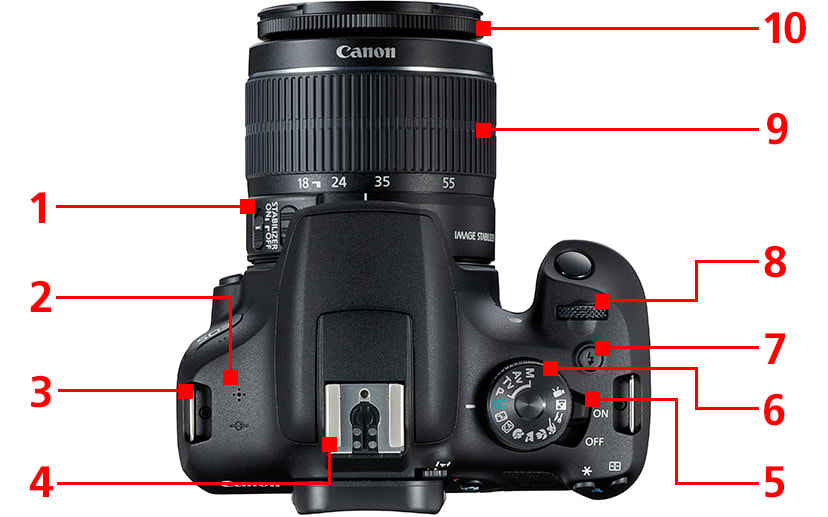
1-Focus Mode Switch
2-Speaker 3-Strap Mount 4-Hot Shoe 5-Power Switch 6-Mode Dial 7-Flash Button 8-Main Dial 9-Zoom Ring 10-Focus Ring |
|
Shutter Speed
What is Shutter Speed? What does it control?
Shutter speed is defined as the time for which a shutter is open at a given setting.
What is it measured in?
It is measured in fractions of a second.
What setting should the program dial be on?
The program dial should be on TV/S, the camera controls the aperture and you control the shutter speed.
Shutter speed is defined as the time for which a shutter is open at a given setting.
What is it measured in?
It is measured in fractions of a second.
What setting should the program dial be on?
The program dial should be on TV/S, the camera controls the aperture and you control the shutter speed.
Set 1-


What did you learn from the first set so you could improve your second set.
Taking set 1 taught me the best shutter speed needed for certain amounts of movement. Set 1 was a good practice to prepare for set 2. It made using a camera easier the next time I used it because I knew what to do better.
Set 2-


ISO-400
Shutter Speed- 1/20 Aperture-F16 |

ISO- 400
Shutter Speed- 1/200 Aperture- F8 |
Levitation
The point of this task was to take a photo showing someone levitating, not jumping. To achieve this, both I and the subject had to follow a few tips and tricks. This included: a fast shutter speed, the subject tucking in clothes so they didn't move with the momentum, and having her keep her feet flat.
Yowa Yowa

|

|

|
My Response
Best Attempts

|

|

|
ISO:
In most cases the ISO was 400.
Lighting Conditions:
Natural daylight is best, with the light hitting the subject mostly from the front.
Best Shutter Speed:
200, sometimes 800 worked best for me.
WWW:
The fast shutter speed worked well to photograph the moment where the subject's feet are off the ground, as if she was floating.
EBI:
The subject's feet are not flat, for many photos she is not even off the ground. For many of the pictures, there is too much empty space and the subject isn't positioned well.
Tips:
For the subject: Tuck in clothes, keep feet flat, and keep face neutral.
For the photographer: A fast shutter speed, taking a photo with the subject to remain in the frame while jumping, and shooting from low or medium perspectives can all help giving the photo the look of having the subject levitating.
Homework

|

|
This is great- I am sad you didn't photograph even more levitating objects.
Image Analysis Francesca Woodman Homework
Francesca Woodman was an american photographer known for her surrealist black and white self-portraits. She was born on 3 April 1958 in Denver, Colorado. Her father was a painter, her mother a sculptor, and her brother an electronic artist. Woodman started taking photographs when she was 13 years old, inspired by fashion photographers such as Guy Bourdin and Deborah Turbeville.
Providence, Rhode Island (1975-78)

This photograph, consisting only of Woodman and an empty room, is a prime example of her work. It is untitled so remains known as 'Providence, Rhode Island (1975-78)'. Her body is facing away from the camera and her whole figure, aside from her feet, are blurry and out of focus due to motion.
Francesca Woodman intended to create surreal and ghostly imagery. She did this by using a double exposure and long shutter speeds to blur her movement, as well as taking her photo s in black and white to set the mood. She wanted to invoke an uncanny feeling in the viewer, never showing the full truth of the subject, hiding behind blur. Also, she created a sense of urgency because of her perpetual unwillingness to stay still. Woodman considered representation of the body in this piece of work. This is shown by her hunched back and crouched figure, arms out in front of her in a strange pose. She wanted to explore reshaping her figure to change how her body is judged by the viewer. Woodman used a slow shutter speed and manipulation of the light to capture this blurred and surreal photo. This helped to create the effect of her blurred hands and face with her feet in sharp focus, her shadow stretching behind her. This helps to support her intention of distorting her body into a ghostly figure. Therefore refusing to be defined by the viewer.
Attempting To Replicate Francesca Woodman
I aimed to recreate Woodman's style by copying her use of slow shutter speeds.
Examples of her work:
Examples of her work:

First Attempts |

|
Best Attempts

The ISO I found to be most useful was one of 400. A dark atmosphere might appear the ideal lighting conditions but I found bright natural light to be the most useful. The ideal shutter speed was quite a slow one and differed often, for example from 1/40 to 1/5 with two of my best attempts. I found the greyscale of my photographs to set the mood, and the slow shutter speed to work quite well in my edited photos. Many subjects were difficult to photograph and did not end out as nicely.
|

|

|
Aperture
|
Aperture- The opening by which light enters the camera, aperture is one of the factors in achieving correct exposure. Measured in f stops (F for focal length).
|

|

|
Depth of Field- This is how much is in focus in front and beyond your subject. Changing the aperture can increase or decrease the depth of field.
|

f4
1/2000 ISO 400 |

f8
1/320 ISO 400 |

f22
1/50 ISO 400 |
My photos do not display the change in depth of field very well and due to some subjects' movements, the photos do not like identical. However, I do believe the composition of the pillars was well thought out.
Composition
This task required me to find examples of nine different compositions.
Composition Exercise 1
When looking for my images, I kept an eye out for notable shapes. These shapes were the basic foundation of my surroundings and proved very useful in helping me locate these nine compositions. The required shapes appeared in a wide variety of ways; including in an abstract manner, those that closely resembled the sheet, as well as shapes within shapes through the use of cropping and rotation.

|

|
I believe the exposure is well-balanced, meaning it is not over or under exposed. This allows the photos to have a more bright but natural look. I used a range of perspectives to clearly display the shapes. Additionally, I am fond of my top three because they are well rotated and colourful but quite displeased with my cross in the centre. It seems out of focus and in need of rotating.
GIF

